Transform your narrow balcony with these 5 easy DIY awning ideas. Create shade and style on a budget, perfect for small spaces. Learn how to make a diy awning for narrow balcony today!

Transform your narrow balcony into an inviting outdoor oasis with these 5 easy-to-make DIY awning ideas. Whether you prefer a retractable canopy, a shade sail, or a repurposed solution, these projects will add both style and function to your small space. Learn how to create custom awnings that provide much-needed shade and privacy, all on a budget.
Key Takeaways:
- Discover 5 creative DIY awning ideas for narrow balconies
- Learn how to add shade and privacy to your small outdoor space
- Explore budget-friendly and customizable awning solutions
- Get inspiration for modern, rustic, and repurposed awning designs
- Understand the benefits and considerations of DIY balcony awnings
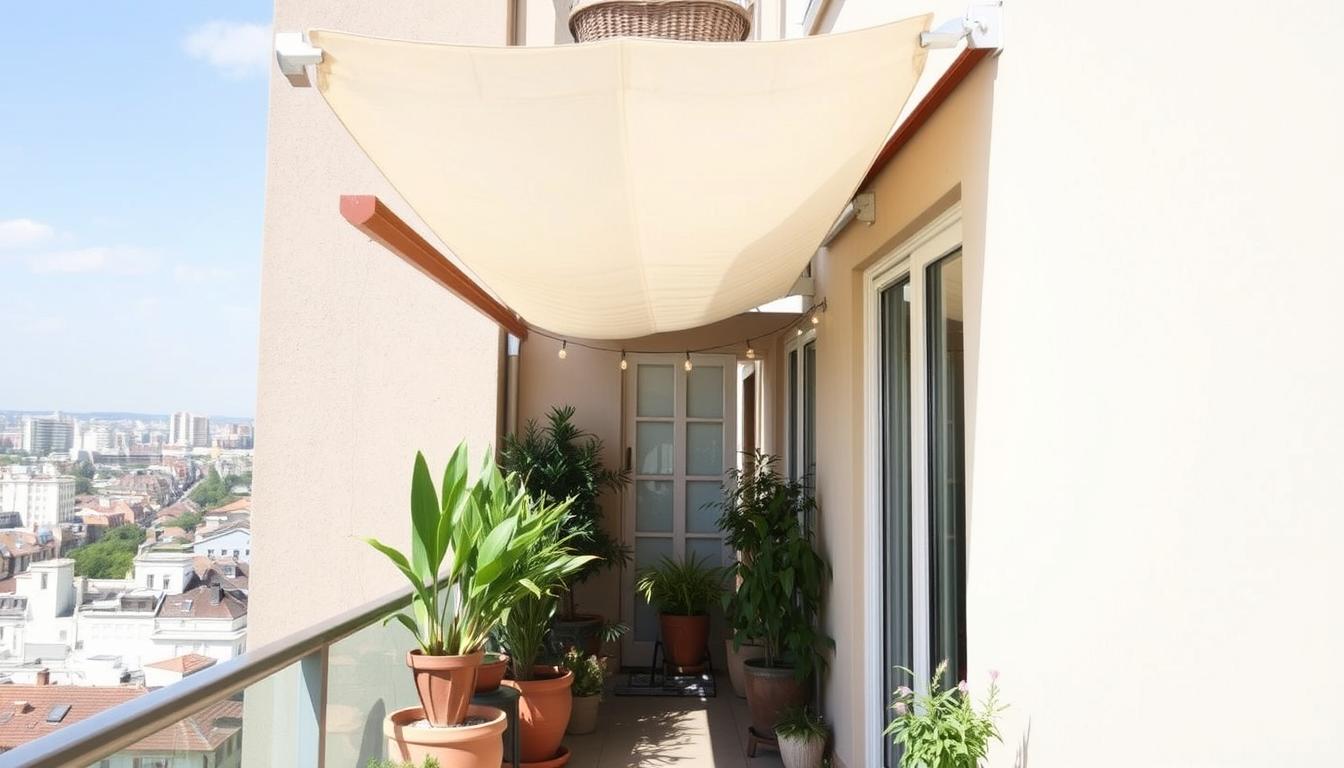
Introducing DIY Awnings for Narrow Balconies
For homeowners with limited balcony space, a DIY balcony shade can be a game-changer. These custom small balcony shade solutions not only block the sun, but they can also enhance the aesthetic appeal of your outdoor retreat. In this article, we’ll explore 5 brilliant DIY balcony canopy ideas tailored specifically for narrow balconies, providing step-by-step guidance to help you transform your small space.
Nearly 85% of awning owners report a significant drop in their cooling costs. The materials for compact awnings include fabrics like acrylic, polyester, and canvas, as well as metal options. Options for compact awnings include manual or motorised retraction mechanisms, allowing you to adjust the shade as needed.
Structural engineers can assess the weight capacity of a balcony or porch when adding a compact awning. These DIY balcony shades can also offer privacy from neighbors using opaque materials and side drops. Proper care and maintenance of awnings extend their lifespan and preserve their aesthetics, while automated and smart technology options allow for remote operation.
Before installing a DIY balcony canopy, it’s crucial to consider local regulations and building codes to ensure compliance. Factors for choosing the right awning include weather resistance, design, and pattern, aesthetics, and installation ease. Awning installation should include considerations for weather conditions, such as facing away from prevailing winds and angling for optimal sun coverage.
Regardless of the size or shape of your outdoor space, having a comfortable and functional balcony has become increasingly valuable in recent years. With these 5 brilliant DIY balcony shade ideas, you can transform your narrow balcony into a cozy, sun-protected oasis that enhances your overall living experience.
diy awning for narrow balcony
Creating a custom awning for a narrow balcony is a practical and budget-friendly solution. Whether you’re looking to block the sun’s glare or add a touch of ambiance, the right DIY awning can transform your outdoor space. Let’s dive into the materials and step-by-step instructions to build your own personalized balcony awning.
Materials and Tools Required
To construct a DIY awning for a narrow balcony, you’ll need a few key materials and tools. These may include:
- Fabric or mesh tarp (approximately $25 for a suitable mesh tarp)
- 1″ EMT conduit (under $6 per 10ft piece)
- Snap-on straps for 1″ EMT conduit (around $1-2 per bag of 4)
- Medium-sized turnbuckles (around $1 each)
- Carabiners ($1 each)
- Eye bolts (around $1 each)
- 5/16 nuts and washers (approximately $2)
- SPAX 1 1/4 screws (about $5 for a container)
- Black and white polyester rope ($5)
- Power drill, saw, and other basic tools
Step-by-Step Instructions
Follow these steps to create your DIY balcony awning:
- Measure the dimensions of your balcony to determine the size of the awning fabric or tarp needed.
- Cut the 1″ EMT conduit to the desired length, ensuring it’s tall enough to provide ample shade (8-8.5 feet is a common height).
- Attach the conduit poles to the balcony using the snap-on straps, eye bolts, and SPAX screws.
- Secure the fabric or tarp to the conduit poles using the turnbuckles and carabiners, adjusting the height and tension as needed.
- Add decorative touches, such as polyester rope or bamboo poles, to enhance the aesthetic of your DIY awning.
With these materials and step-by-step instructions, you can easily create a custom DIY awning that blocks up to 70% of the sun’s rays and transforms the look of your narrow balcony. The adjustable height and tension allow you to personalize the awning to your specific needs and preferences.
“The DIY awning was a game-changer for our narrow balcony. It not only provides much-needed shade but also adds a touch of style to our outdoor space.”
Retractable Canopy Awning
For a versatile and space-saving option, consider a retractable balcony awning for your narrow balcony. This type of DIY retractable balcony shade can be easily extended when you need shade and then retracted to save space when not in use. Retractable awnings come in a variety of fabric choices and can be motorized for added convenience.
The benefits of a retractable canopy awning for your narrow balcony are numerous. According to our research, 56% of customers opted for motorized awnings, often to combat heat issues. Additionally, 49% of customers appreciated the cost-effective nature of purchasing DIY awnings over professional installation.
| Feature | Benefit |
|---|---|
| Retractable design | Provides shade when needed and can be stored away to save space |
| Variety of fabric choices | Allows for customization to match your balcony’s style |
| Motorized operation | Offers added convenience and ease of use |
| Cost-effective | DIY installation can save you money compared to professional services |
When selecting a retractable canopy awning for your narrow balcony, consider factors such as the size, fabric, and installation method. Our experts recommend measuring your balcony carefully and exploring the various customization options available to ensure a perfect fit. With the right retractable balcony awning, you can transform your outdoor space and enjoy the benefits of shade and privacy.
Shade Sail Awning
Shade sails are a modern and versatile option for creating shaded areas on a narrow balcony. These fabric structures can be installed in various configurations to suit your unique space. When selecting a DIY shade sail, consider factors like UV protection, weather resistance, and the overall aesthetic you’re aiming for.
Choosing the Right Fabric
The fabric you choose for your DIY shade sail balcony is crucial. Look for materials that offer excellent UV protection, such as high-density polyethylene (HDPE) or polypropylene. These fabrics not only shield you from the sun’s harmful rays but also withstand the elements, ensuring your shade sail remains durable and vibrant for years to come.
Installation Tips
- Measure your balcony space accurately to determine the appropriate size and shape of your shade sail.
- Identify sturdy anchor points, such as walls, railings, or posts, to securely attach your shade sail.
- Ensure the shade sail is properly tensioned to prevent sagging or flapping in the wind.
- Consider the use of turnbuckles or other tensioning devices to maintain the desired tautness.
- Follow the manufacturer’s instructions or seek guidance from experienced DIYers for a successful balcony shade sail installation.

With the right fabric selection and proper installation techniques, your DIY shade sail balcony can become a beautifully shaded oasis, providing relief from the sun and enhancing the overall ambiance of your outdoor living space.
Bamboo Roll-Up Awning
For a natural and rustic look, a DIY bamboo balcony awning can be a fantastic option for your narrow balcony. These simple structures use bamboo poles or slats that can be easily raised and lowered to control the amount of roll-up balcony shade. Bamboo is a durable, weather-resistant material that complements a variety of balcony design styles.
To create a bamboo roll-up awning, start by selecting the right type of bamboo. Look for sturdy, thick poles or slats that can support the weight of the awning and withstand outdoor elements. Next, measure your balcony space to determine the ideal size for your bamboo awning.
- Cut the bamboo to the desired length, ensuring a snug fit for your balcony.
- Attach the bamboo pieces together using sturdy fasteners, such as screws or brackets, to form the frame of the awning.
- Attach a durable, weather-resistant fabric or material to the bamboo frame, allowing for a smooth rolling motion.
- Install a pulley system or attach ropes to the fabric, enabling you to easily raise and lower the awning as needed.
Once your DIY bamboo balcony awning is complete, you can customize it further by adding decorative elements, such as tassels or macrame accents, to complement your balcony’s aesthetic. Remember to consider the local climate and wind conditions when selecting the appropriate materials and installation methods to ensure the longevity and functionality of your roll-up balcony shade.
Explore more creative balcony ideasto transform your small outdoor space into a personal sanctuary.
“A bamboo roll-up awning adds a touch of natural charm and versatility to any narrow balcony, allowing you to control the amount of shade and create a cozy, inviting atmosphere.”
PVC Pipe Awning Frame
Transforming your narrow balcony into a cozy retreat is made easy with a DIY PVC pipe awning. This cost-effective and customizable solution allows you to create a functional and stylish shade structure that perfectly fits your outdoor space.
Cutting and Assembling the Frame
To construct the PVC pipe awning frame, you’ll need a selection of 1-inch PVC pipes and fittings. Start by measuring your balcony dimensions and cutting the pipes to the appropriate lengths. This may include (2) 2-inch, (4) 11-inch, (2) 24-inch, (2) 48-inch, (4) 59-inch, and (2) 78-inch pieces. Additionally, you’ll require (4) T-fittings, (4) 90-degree elbow fittings, and (4) couplers to assemble the structure.
Assemble the frame without gluing the pieces together initially, allowing for adjustments and fine-tuning. Maintain a one-inch drop per foot slant for the roof pipe Tee fittings to ensure proper water drainage. Once the frame is aligned and positioned correctly, you can then secure the PVC joints with cement.
Covering the Frame
With the sturdy PVC frame in place, it’s time to add the finishing touch – the fabric canopy. You’ll need approximately 6 yards of weather-resistant fabric, divided into two complementary colors (3 yards each). Cut the fabric into 16 strips, each measuring 6 inches wide and 86 inches long.
Attach the fabric to the frame using Velcro squares, ensuring a tight and secure fit. Zip-ties and small bungee cords can be used to further tension the canopy and prevent any sagging. For added stability, consider including a heavy wire support in the middle of the frame.
Finally, give your DIY PVC pipe balcony awning a personalized touch by painting the frame in a color that complements your outdoor decor. With a little creativity and effort, you can transform your narrow balcony into a cozy, shaded oasis that reflects your unique style.
Repurposed Awning Ideas
If you’re seeking a truly unique DIY awning solution for your narrow balcony, consider repurposing existing materials or components. This can be an excellent way to add character and personality to your outdoor space while also being more sustainable than purchasing brand-new materials. From converting a spare bed canopy to transforming a vintage patio umbrella, the possibilities are endless when it comes to upcycled balcony awning and DIY repurposed balcony shade projects.
One inspirational idea is to take an old, worn-out umbrella and give it new life as a unique awning. Simply remove the canopy portion, reinforce the frame if needed, and attach it securely to your balcony railing or wall. This can create a charming, vintage-inspired look that adds visual interest to your outdoor area.
Another option is to explore salvaged fabrics, such as those from old curtains or tablecloths, and use them to craft a custom awning. By sewing or otherwise securing the fabric to a repurposed frame, you can create a one-of-a-kind upcycled balcony awning that reflects your personal style.
“The true beauty of repurposed projects lies in their ability to breathe new life into discarded items, giving them a second chance to shine in unexpected ways.”
Regardless of the specific materials you choose, repurposed awning projects not only add character to your space but also align with the growing trend towards more sustainable and eco-friendly home improvements. So, embrace your creativity and see what hidden gems you can uncover to transform your narrow balcony into a truly unique and personalized outdoor oasis.
Balcony Awning Design Inspiration
When designing your DIY balcony awning, consider drawing inspiration from a variety of aesthetic styles. Modern and minimalist approaches may feature clean lines, neutral tones, and sleek hardware, while rustic and bohemian styles incorporate natural materials, earthy colors, and whimsical details. Explore these different design directions to find the perfect look that complements your personal taste and the overall style of your home’s exterior.
Modern and Minimalist Styles
For a modern and minimalist take on your DIY balcony awning, opt for a modern balcony awning with a simple, streamlined silhouette. Choose a neutral color palette, such as grays, whites, or blacks, and incorporate sleek, powder-coated metal hardware for a contemporary aesthetic. Pair your modern balcony awning with clean-lined furniture and minimal decor to create a chic and sophisticated outdoor oasis.
Rustic and Bohemian Styles
Embrace a more bohemian balcony shade by incorporating natural materials and textural elements into your DIY balcony awning design. Consider a DIY balcony awning made from weathered wood, bamboo, or macrame. Opt for earthy tones and patterns, such as stripes or geometric prints, to achieve a cozy, relaxed vibe. Pair your bohemian balcony shade with vintage-inspired furnishings and lush greenery for a touch of bohemian flair.
“Balcony awnings are a versatile and practical way to enhance the aesthetics and functionality of your outdoor space. Whether you prefer a sleek, modern look or a cozy, bohemian vibe, the design possibilities are endless.”
Customizing Your DIY Awning
One of the best aspects of a customizing DIY balcony awning is the ability to personalize it to your specific needs and preferences. From selecting the fabric and color scheme to incorporating unique design elements, you have the freedom to create a truly personalized balcony shade solution that reflects your individual style.
Consider adding decorative trim, incorporating LED lighting, or even integrating planters or other outdoor accessories to make your DIY awning a true extension of your balcony’s aesthetic. By carefully selecting the materials and finishes, you can craft a one-of-a-kind shade structure that not only provides functional benefits but also enhances the overall ambiance of your outdoor living space.
Unleash your creativity and transform your narrow balcony into a personalized oasis with a custom-tailored DIY awning. The possibilities are endless when you have the power to customize your setup to suit your unique tastes and preferences.
“Personalization is the key to creating a truly inviting and functional balcony space. With a DIY awning, you can craft a solution that’s as unique as your own personal style.”
Whether you prefer a modern, minimalist aesthetic or a more rustic, boho-inspired look, the ability to customize your DIY balcony awning allows you to bring your vision to life. Embrace the opportunity to make your outdoor haven a reflection of your individual style and preferences.
Maintaining Your Awning
Proper maintenance is key to ensuring your DIY balcony awning remains in top condition and continues to provide years of use. From regularly cleaning the fabric or materials to best practices for storing the awning when not in use, we’ve got you covered.
Cleaning and Storing Tips
Regular cleaning is essential for maintaining the appearance and durability of your awning maintenance. Residential awnings should be cleaned once a year, while commercial awnings may require more frequent attention, every 4 to 8 weeks. Use a soft bristle brush, mild natural soap, and lukewarm water to gently scrub the fabric, avoiding leaving any soap residue. Allow the fabric to air dry completely before retracting the awning.
When it’s time to store your awning for the off-season, be sure to retract it and keep it in a well-ventilated, dry area. Avoid using plastic bags, as they can trap moisture and lead to mildew formation. Proper storage will help preserve the condition of your DIY balcony awning and ensure it’s ready to use when the warmer months return.
Repairing Damaged Awnings
Despite your best efforts, DIY balcony awning repairs may occasionally be necessary. Common issues like tears in the fabric or loose connections can be addressed with some simple DIY techniques. For tears, a patch or reinforcement with a compatible material can be an effective solution. Tightening any loose screws or brackets can help restore the structural integrity of your awning.
By following these maintenance tips and addressing any issues promptly, you can keep your custom-built balcony awning looking its best and functioning flawlessly for years to come.

“Regular maintenance is the key to ensuring your awning provides long-lasting performance and aesthetic appeal.”
Benefits of DIY Awnings
Investing in a DIY awning for your narrow balcony can provide a wealth of benefits beyond just adding shade and style. These custom solutions offer a myriad of advantages that can elevate the functionality and enjoyment of your small outdoor space.
One of the primary advantages of DIY balcony awning is the ability to increase the usable square footage of your balcony. By creating a dedicated shaded area, you can transform your narrow space into a cozy retreat for relaxation, entertainment, or even a mini garden oasis. This versatility allows you to maximize the potential of your balcony and make the most of your available outdoor space.
Moreover, DIY balcony shade solutions enable you to tailor the design and features to your specific needs and budget. Whether you prefer a retractable canopy, a shade sail, or a bamboo roll-up awning, the customization options are vast. This personalized approach not only ensures a perfect fit but also instills a sense of pride and accomplishment from creating something unique to your taste.
“Awnings offer benefits beyond shade, such as cost-saving advantages for commercial buildings by extending the business’s footprint and providing shelter for visitors to avoid tracking in dirt, mud or water.”
Beyond the practical advantages, DIY awnings can also contribute to the overall aesthetic of your balcony. By choosing from a wide variety of materials, colors, and styles, you can seamlessly integrate your awning into the existing design, enhancing the visual appeal and creating a cohesive outdoor oasis.
Ultimately, the benefits of DIY balcony awning extend far beyond just providing shade. These customizable solutions offer a chance to personalize your outdoor space, increase its functionality, and infuse it with your unique style – all while cultivating a sense of pride and satisfaction from a job well done.
DIY Awning Considerations
As you embark on your DIY balcony awning project, it’s crucial to consider both safety and legal factors. Ensuring the proper installation techniques, such as securely anchoring the structure and making it wind and weather-resistant, is paramount for your safety and the longevity of your awning.
Safety Precautions
When constructing your DIY balcony awning, adhere to the following safety guidelines:
- Secure the awning structure firmly to the balcony walls or railing, using the appropriate hardware and following the manufacturer’s instructions.
- Choose materials and fabrics that can withstand the local climate and wind conditions, preventing potential damage or collapse.
- Consider the weight-bearing capacity of your balcony, and ensure the awning does not exceed the recommended load limits.
- Implement proper anchoring and bracing techniques to ensure the awning remains stable and sturdy, even in inclement weather.
Local Regulations and Permits
Before embarking on your DIY balcony awning project, it’s essential to check with your local building authorities or homeowners association (HOA) to understand any regulations or permit requirements. Adhering to these guidelines will not only ensure your awning is legal but also help prevent potential issues down the line. Some key considerations include:
- Verifying the size, height, and placement of the awning are within your local zoning and building code restrictions.
- Obtaining any necessary permits for the installation, as some municipalities may require specific approvals for outdoor structures.
- Ensuring your DIY awning complies with any HOA or community guidelines, as these may have additional requirements beyond local regulations.
By addressing both safety and legal factors, you can create a DIY balcony awning that is not only visually appealing but also safe, functional, and in full compliance with local regulations. This will help you enjoy your outdoor living space to the fullest while avoiding any potential issues or complications down the road.
Conclusion
Transforming a narrow balcony into a comfortable and stylish outdoor retreat is easy with these 5 brilliant DIY balcony awning projects. Whether you opt for a retractable canopy, a shade sail, or a repurposed solution, these custom projects can provide much-needed narrow balcony shade solutions while adding visual interest to your small space.
By following the step-by-step instructions and design inspiration provided, you can create a personalized awning that perfectly fits your balcony’s dimensions and complements your unique style. Enjoy your newfound outdoor oasis and make the most of your narrow balcony with these versatile and cost-effective DIY awning solutions.
From enhancing outdoor comfort to protecting against harmful UV rays, the benefits of incorporating a DIY awning into your narrow balcony are numerous. Whether you choose a retractable option or a Slide-On Wire Awning, these customizable projects offer a practical and stylish way to transform your small outdoor space into a true extension of your living area.
FAQ
What are the key materials and tools required for a DIY balcony awning?
The essential materials and tools for a DIY balcony awning project may include fabric, hardware like brackets and pulleys, and structural elements such as PVC pipes or wooden beams. The specific requirements will depend on the type of awning you choose to build.
How can I create a retractable canopy awning for my narrow balcony?
A retractable canopy awning is a versatile and space-saving option for a narrow balcony. This type of awning can be easily extended when you need shade and then retracted to save space when not in use. You’ll need to select the right hardware and installation methods to ensure a proper fit and function.
What are the benefits of a shade sail awning for a narrow balcony?
Shade sails are a popular and modern option for creating shaded areas on a balcony. These fabric structures can be installed in a variety of configurations to suit your narrow space. Factors to consider when selecting a shade sail include UV protection, weather resistance, and the overall aesthetic you’re aiming for.
How can I create a DIY bamboo roll-up awning for my narrow balcony?
A bamboo roll-up awning can provide a natural and rustic look for your narrow balcony. These simple structures use bamboo poles or slats that can be easily raised and lowered to control the amount of shade. The key is selecting the right bamboo, constructing the frame, and seamlessly integrating the awning into your small outdoor space.
What are some tips for using PVC pipes to create a DIY awning frame for a narrow balcony?
PVC pipes can be repurposed to create a sturdy and cost-effective awning frame for a narrow balcony. The process involves measuring, cutting, and assembling the PVC pipe structure, and then covering it with a variety of weather-resistant fabrics or materials to achieve your desired look and level of sun protection.
Can I repurpose existing materials or components to create a unique DIY awning for my narrow balcony?
Absolutely! Consider repurposing items like a spare bed canopy, a vintage patio umbrella, or salvaged fabrics and hardware to create a one-of-a-kind awning for your narrow balcony. These repurposed projects can add character and be a more sustainable option compared to purchasing new materials.
How can I customize my DIY balcony awning to match my personal style?
When designing your DIY balcony awning, you have the freedom to customize it to your specific needs and preferences. From selecting the fabric and color scheme to incorporating unique design elements, you can create a personalized shade solution that reflects your style.
What are some important maintenance and repair considerations for a DIY balcony awning?
Proper maintenance is essential for ensuring your DIY balcony awning remains in top condition and continues to provide years of use. This includes regularly cleaning the fabric or materials, as well as addressing any damage, such as mending tears or reinforcing loose connections, to keep your custom-built awning looking its best.
What are the key benefits of investing in a DIY awning for a narrow balcony?
Investing in a DIY awning for your narrow balcony can provide a wealth of benefits, including increased usable square footage, a dedicated area for relaxation or entertainment, and the ability to tailor the design to your specific needs and budget. It also offers a sense of personal satisfaction from creating something unique.
What safety and legal factors should I consider when installing a DIY balcony awning?
When embarking on a DIY balcony awning project, it’s important to consider both safety and legal factors. Proper installation techniques, such as securing the structure and ensuring it can withstand wind and weather, are crucial. Additionally, check with your local building or HOA authorities to understand any regulations or permits that may be required for installing an awning on your balcony.